Wednesday, December 28, 2011

Merry Christmas


Merry Christmas and Happy New Year!

Jerome and I just want to wish everybody a happy and safe holiday season filled with family friends and of course food! Thanks so much for joining us for all our cooking adventures, and stay tuned next year as we have some catch up posts to do as well as several recipes we've been planning on trying, and a few new cookbooks to peruse and try out.

Happy Cooking to all and to all a Good Feast!

Laura & Jerome 

Saturday, December 3, 2011

Thanksgiving 2011


This year we decided we were going to tackle our first solo thanksgiving feast. We'd both done parts of big turkey dinners before, but never all of it on our own. We invited some of our friends over, and started planning! For a few of the parts we're going to do separate more comprehensive posts, but here's how everything came together on the day.

Our Menu:

Appetizers / Snacks
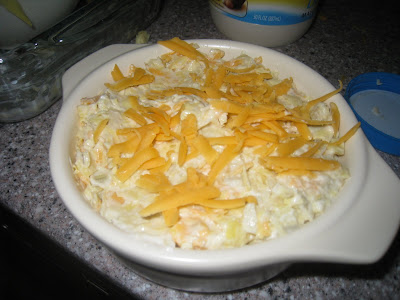
Cheesy dip

Main
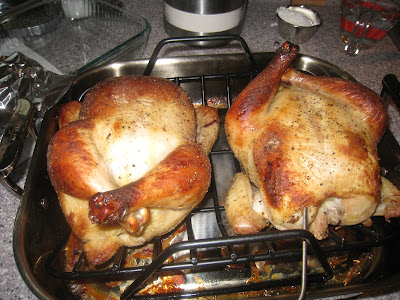
Brined Chickens
Stuffing
Mashed potatoes
Gravy
Brussel sprouts (steamed)
Carrots
Baguette

Dessert
Chocolate Cranberry Tart


Next because we were a bit apprehensive about getting all of that food prepared for the exact same time, we made ourselves a time line which we printed and stuck to the fridge to help us remember where we were supposed to be at. 

Sunday 
plan, shop,
plan plates


Make brine

Two nights before:
Tidy up

Night before:

Laura prepares dough for bread


Prepare cranberry topping (can be done 2 days ahead)


Mascarpone filling (can be done 1 day ahead)

Morning:

7:30 Starting brining


Make crust for dessert  (Oven @ 350 for 14 minutes)


Bake baguette (Oven @ 450 for 20 minutes)


Prep cheesy dip (15 minutes)


Take Break for breakfast


Assemble stuffing
Figure out oven layout for chickens.


Wash trim and chop veggies


12:00 -  take chickens out of fridge
12:50 - Cheesy Dip (Oven @ 350 for 20 minutes)


1:00 - Guests arrive bringing beautiful flowers!


1:10 - Chicken (Over @ 475 for 20 then 375 until done, approx 1.5 hours)


2:10 - Stuffing (Oven @ 375 for 40 minutes)


2:10 - mashed potatoes (30 minutes)
2:30 - vegetables (carrots, burssel sprouts)


2:40 - gravy

3:00 - eat!

Everything ready to be eaten!


Everyone's hungry!


A delicious feast! If I do say so myself.

If you want to see the final awesome dessert Jerome made stay tuned for next episode! It'll be worth the wait it was pretty epic!


Posted by Picasa

Wednesday, November 30, 2011

Jerome "Moustachio" Mourits' Perpetual Moustache Machine

Being November 30th, it was the last day for Jerome's face fur to grow. 
As you can see he did a pretty great job both growing and ungrowing it! 
We'd like to thank everyone who donated very much, we really appreciate it! 


And if you were still interested, there's still time, visit       http://mobro.co/jmourits.
Hope you had as much fun this Movember as we did! 

Stay tuned, regular cooking blogs will be back imminently! 
Starting with our Thanksgiving Feast posts  later this week! 


Sunday, November 20, 2011

Movember!

Today's post is a bit different than usual, no tasty edibles or recipes, but it's for a good cause we promise! 
Jerome has been participating in Movember and growing a neat moustache for the month to raise awareness and funds for men's health and prostate cancer. 


During November each year, Movember is responsible for the sprouting of moustaches on thousands of men’s faces, in the US and around the world. With their Mo’s, these men raise vital funds and awareness for men’s health, specifically prostate cancer and other cancers that affect men.

As you can see Jerome's moustache is well underway and we'd really appreciate any help you could give to  support a worthy cause (and moustache)!

http://mobro.co/jmourits

Thank you! 

Sunday, November 13, 2011

Mexican Lasagna

Tonight we had one of our stand-by comfort dinners. It's quite easy, not a lot of dishes and has lots of taste and veggies all in one nice tasty and spicy package! It's from the cookbook Eat Shrink and Be Merry and it's official name is No Weigh, Jose! Mexican Lasagna because the lean meat and abundance of veggies. Here's the recipe as we've tweaked it over the years:

1.5 lbs extra lean ground turkey
1 cup diced red or regular onions
1 cup diced green bell or pasilla pepper (or if we don't have one, some chopped up pickled jalepenos)
2 tsp/cloves minced garlic
1 can black beans rinsed and drained
1 can diced tomatoes
1 cup frozen or canned corn
1 1/2 tsp chili powder }
1 1/2 tsp cumin }  we substitute these two with 1 tbsp or so of our taco seasoning
3 cups total of salsa and tomato pasta sauce - depending on what we have hanging around
Fresh ground pepper
Fresh minced cilantro if it's handy
4 tortillas
Grated cheese
Sour cream and green onions for garnish if you have them

You can easily vary the level of spiciness to your taste with the hotness of the salsa, tomato sauce, peppers and spices - you'll probably have guessed by now we use hot salsa, spicy spaghetti sauce, and an extra few scoops of taco seasoning! 

Preheat the oven to 375 degrees. 
You'll need a deep 9x9" casserole dish or if it's shallower than a 9x13" as well as a large non-stick pan or a skillet if you have one big enough. 


Start by cooking the ground turkey, onions, garlic and the green pepper if you have it.


Once the turkey is cooked through add the spices, black beans, tomatoes, corn.
Stir through and cook for another few minutes - until the corn is defrosted and heated through. 

Next add the salsa, tomato sauce, some black pepper and the pickled jalapenos if you're using those.
Stir through, bring to a boil, cover and simmer for about 5 minutes. Stir in the cilantro as you turn off the heat. 

Next comes the lasagna part. Coat the bottom of the dish with a thin layer of your mixture so nothing sticks to your dish. 

I figured out if you cut the tortillas in half and put the flat sides to the edges you get really good coverage. So lay four halves on top of your initial layer. 

Put half the remaining mixture on top. 

And cover with 4 more tortilla halves. 

Add the rest of the sauce - it just fits in our 9x9 dish.

Add a layer of cheese to the top. Cover with tin foil and cook for 35 minutes at 375. Then remove the tin foil and cook for another 10 minutes. 

Once its done let sit for 10 minutes - that way it will hold together when you cut your pieces out.
And enjoy! It usually lasts us for several dinners and lunches as leftovers! 

Monday, October 31, 2011

Brined roast chicken with maple carrots

We've been thinking having friends over for American Thanksgiving.  Over the past year, I've heard that brining the turkey results in really moist, tasty turkey.  I decided to give it a try this weekend (with chicken rather than turkey.

There's a really great article in Cook's Illustrated about the basics of brining - in particular, it describes some of the science behind brining (it's not just that the flavors penetrate into the chicken - brining the chicken also denatures proteins which helps the meat retain moisture when cooked).

I've also been reading about "dry brining" - from what I've read, people have achieved excellent results with dry brining and it seems like less work.  Maybe next weekend...

This is a recipe works best if you plan ahead - brine needs to be boiled then chilled in the fridge, chicken needs to be brined for a number of hours (at least 3), chicken should air-dry and come to room temperature before cooking. We tried to squeeze this all into a day, and we didn't start making the brine until 1pm - which meant we didn't actually eat until about 9 pm!

I used a recipe from Thomas Keller's Bouchon cookbook for our brined roast chicken recipe.  The following is more than enough brine for two chickens

1 gallon water
1 cup kosher salt
1/3 cut honey
12 bay leaves
1/2 cup garlic cloves, skin on, smashed
2 tablespoons black pepper corns
1/2 ounce rosemary
1/2 ounce thyme
2 ounces italian parsley 
zest and juice of 2 lemons

Combine the ingredients and bring to a boil for 1 minute, then let cool.

Interestingly enough, the Cook's illustrated guide points out that not all salts are equal - depending on the type of salt you use, you may have double the quantity (table salt vs diamond crystal salt).  I'll probably pay more attention to this next time.


Brine ingredients, all ready to go
We didn't have fresh thyme, so we used powered thyme.  It gave our
brine a much swampier look

Once the brine was getting close to boiling, we through in the herbs.


Boil for 1 minute

Since we had time constraints, I wanted to cool the brine as quickly as possible and then get it in the fridge.  I prepared an ice bath in our cooler and that quickly brought the temperature down.  If you're more organized, you can skip this step and just let the brine cool normally and then put in the fridge.


Brine in the ice bath

In general, I think you'd normally brine in a pot, but we found 2.5 gallon zip lock bags.  This was pretty cool, since the bag could be shaped to ensure the that chicken is completely submerged


Chicken in the giant bag


Added in half the brine

We stored half the brine to be used for next chicken


Brine set aside

To accompany our chicken we made maple-glazed carrots (based off this recipe: http://www.epicurious.com/recipes/food/views/Maple-Glazed-Carrots-107500).  Laura also made buns, but she'll blog about those separately.


Carrots boiled in water + sugar + salt until soft
Various sources I read online had differing opinions on whether the brined bird should be rinsed.  Thomas Keller suggested rinsing and reasoning, so that's what I did.


Rinsing the brined bird
We seasoned and trussed the chicken and let it sit at room temperature for about 30 minutes.  The chicken goes into the oven at 475° and cooks for about 40 minutes.  We have a digital read thermometer - it should cook until the temperature reads about 158° - while resting it'll get up to the desired 165°.  Also note that after about 15 minutes or so, check how the chicken is browning.  If it's browning too quickly, cover it with some aluminum foil


Seasoned, trussed chicken

While the chicken was the oven, we finished off the carrots - some butter, maple syrup, brown sugar and toss the carrots in the mixture.


combining butter, maple syrup and brown sugar


heat the carrots in the mixture

The carrots were pretty good - I think i'd tweak this recipe a bit in the future though.  I'd use less butter and perhaps a touch more sugar.

Maple-glazed carrots!

Chicken looks like it's done!

Carving the chicken

I think all around, we agreed that the brining was a huge success - the chicken was very tasty and moist. Laura, a gravy-lover, said that the chicken was so good that it didn't need gravy at all. We ate the whole chicken between three of us and picked the bones clean!


Picking the bones clean

Since we had left over brine from Saturday, we brined another chicken on Sunday. Since the brine was already pre-made, it was much less work.


adding the brine to the chicken

Rinsing the chicken
Seasoning the chicken - this time, less salt, a lot more
pepper, and rosemary.

Nicely browned!

Chicken leg dinner

Chicken breast dinner
This time we had some leftovers - so I guess I know what Laura's going to be having for lunch tomorrow!